Natural stone landscaping projects represent an investment, which is why when it comes to laying flagstones you will want to make sure it is done correctly to avoid problems later.
In most instances, it is advisable to hire a professional and reputable contractor to ensure a job is carried out to the highest standard.
It is however important to research carefully before choosing one.
That can be done by studying online reviews or asking for references and examples of previous work.
You should always feel happy and comfortable they are the right company to do the job before getting started.
While the laying of natural stone paving is a task best completed by an experienced professional, you may decide to do it yourself.
If you do, it is imperative to be fully clued up on both the methodology and materials required – if possible seeking advice from somebody that has done it before.
Should you lay it incorrectly, then several problems might emerge once you’ve finished.
The first step to understanding natural stone paving is to be aware that all-natural stone will vary in tone and texture.
That’s why it’s important to make sure you have more than you need.
If you discover that you don’t have enough paving or some slabs have broken, you will struggle to find a batch that matches those in the original order.
You will also find that randomly selecting a range of different packs will reduce the risk of ‘colour banding’.
When it comes to laying the paving, it is important to remember that flagstones should always be laid flat on a full bed of sand and cement which supports it.
The bed should consist of six parts of sharp sand or, alternatively, an all-in ballast combined with one-part cement.
Once the mixture is of the required consistency, spread a 50mm thick layer that is wider than the dimensions of the slab being laid.
Carefully place it onto the bed, tapping down with a rubber mallet until it is level.
Continue to repeat this process one flagstone at a time, leaving a gap of around 10-12mm between each until the entire area is covered.
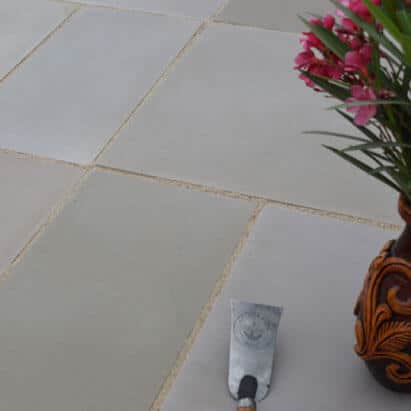
To finish, point your mortar joints. Or, in other words, fill in the gaps!
To make pointing mortar, mix one-part cement to six parts of sand – either soft or building.
Use a trowel to put the mortar into the joints before pressing it down with a pointing bar.
Once you have filled every joint, take a brush and remove any excess mortar from the slabs before it dries.
And there you have it – perfectly-laid natural stone paving.
Be sure to not walk, or place anything on, to the new patio for an initial 24-36 hours.
The mortar should then be set, and within a week your patio will be finished for you to enjoy.
For more information on our range of natural stone paving, please do not hesitate to contact our team by calling 0800 689 5236 or sending a message to info@premiumpavingco.com.